
HOW TO USE 3D CLOUD RENDER-FARM
SESSION 2: FREE USER TRAINING
 |
| RENDERINGFOX .COM CHEAPEST RENDER-FARM IN THE WORLD |
Click here to Regsiter free with www.renderingfox.com for full access to the cloud renderfarm
Last session we had read in brief of different ways to upload 3d project files.As a continuation to our training course today we will see in details the upload options available with Indias first cloud renderfarm, www.renderingfox.com.
Files can be uploaded via 2 methods
1. Webased using online tool
2. FTP based
**We recommend archiving your project files, source materials like textures, scenes etc in .zip or .rar for efficient uploading. Please upload your entire project source file and related attributes
WEB BASED: USING ONLINE TOOL
A) Log into www.renderingfox.com via IE browser. Check the menu on the left hand "Upload File". If this is your first time to use web-upload function, a dialogue box will pop up at the top of your browser, asking whether you are going to install this widget:


C) After the widget is installed, please refresh the page so that it can run correctly. Click "Add Files" to choose files and click "Start Upload" as shown below:

D) After the uploading is done, Click the button "Refresh" to reload the files list. You will find the uploaded files. To unzip the uploaded package, just click on the "Extract"

E) After the extraction complete, you can "Submit Render Task" now.
FTP BASED: USING FILEZILLA FTP UPLOADINGTOOL
If you are an experienced ftp client user, you could skip this tutorial and just need to know the following information:
FTP Host: ftp.foxrenderfarm.com
USER: Your registration id
PASSWORD: Your registration password
Port: 21
1.Download and setup the ftp client software 'Filezilla'.
Click " FileZilla on left side of the page, http://www.renderingfox.com/Support.html then setup "Filezilla" and you'll see a Filezilla icon on your desktop
2. Double-click to run the Filezilla, and input
"ftp.foxrenderfarm.com" into the 'Host' item,
your registered id into "Username"
and your registered password into "Password",
then enter "21" into "Port" item, and at last click the "quick-connect ".

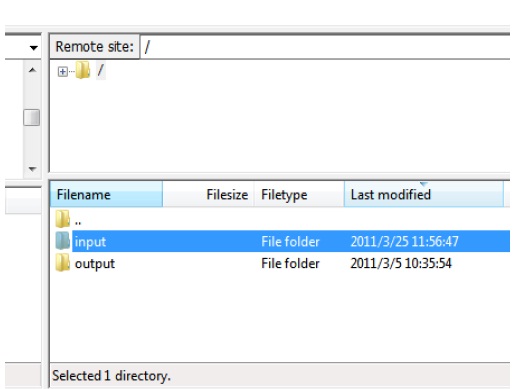
4.Right-click on the archive made in your local disks on the left, then choose the "upload" on the popup menu ,and the progress bar will be shown at the bottom.


No comments:
Post a Comment